|
Lomse library. API documentation
0.30.0
|
|
Lomse library. API documentation
0.30.0
|
The first and most important thing to learn about Lomse is that is platform independent code, with no knowledge about things such as how to display a document on a window on the screen or how to handle mouse events. Lomse provides the necessary services and interfaces for displaying documents and interacting with them but it is your application responsibility to code the presentation layer, that is the methods and functions for creating windows, handling mouse events, etc., and for requesting Lomse the appropriate services, such as rendering the document in the windows buffer or handling the passed events.
As Lomse aims to be platform independent, it does not use any platform specific graphics interface. Instead it uses an abstract interface class, Drawer, and implements two specific derived classes, BitmapDrawer and SvgDrawer. But any user application can implement its own drawer classes and do all drawing natively without having to use the drawer classes implemented by Lomse.
These operations are usually triggered by your application when handling some operating system events, such as window paint events. Before entering into details it is necessary to understand some important concepts. If you are new to Lomse, please read in sequence this document.
The Model-View-Controller (MVC) is an architecture for providing isolation between the various functions of the GUI: maintaining the document (the Model), displaying all or a portion of the document (the View), and handling events that affect the model or the view(s) (the Controller).
Lomse MVC model has four components: the Model (the document), the View (its visual representation), the Interactor (a kind of Controller) and the Presenter (the 'glue' to join all the pieces):
The Presenter and most associated objects are created when your application invokes any of the methods in LomseDoorway for opening/creating documents:
Your application will take ownership of the Presenter and will have to delete it when no longer needed. Deleting the Presenter will automatically cause deletion of all MVC involved objects: the Document, all existing Views and their Interactors, selection sets, undo/redo stacks, etc.
By default, when the presented is created, a View and its Interactor are created. Method Presenter::get_interactor() provides a smart pointer to the desired Interactor:
Normally, the Interactor is the only object you would need to use for interacting with the associated View and with the Document.
The SVG rendering facilities are very simple. It is basically opening a document and requesting its rendition. The View will render the document on a std::ostream that your application must provide, and once Lomse has generated the SVG code, it is your application responsibility to do whatever is needed with that code: injecting it in an HTML page and displaying it on a browser window embedded into your application, exporting it as an image file, etc. For instance:
See Render in SVG format for details
The Lomse facilities for rendering on a bitmap are oriented to traditional desktop applications. The View renders the document on a memory buffer that your application must provide. Once Lomse has rendered the document on this bitmap buffer, it is your application responsibility to do whatever is needed with the bitmap: rendering it on a window, exporting it as a file, printing it, etc.
Once the View is created (remember that it is created automatically when your application invokes any of the methods in LomseDoorway for opening/creating documents), and before processing any paint event, it is necessary to inform Lomse about the rendering buffer to use. The memory for this buffer must be allocated when necessary, normally when the window is created and each time it is resized. Therefore, the event handler for window resize events is, usually, the best place for allocating memory for the buffer and informing Lomse about the new buffer:
Probably you have noticed that the format of the bitmap (i.e., bytes per pixel, byte ordering, etc.) has not been specified in previous code. The place for doing it is at Lomse library initialization (see next section).
Deciding the how to allocate memory for the rendering buffer and the bitmap format to use are the most critical decisions when using Lomse. Depending on your application operating system and on the application framework used for coding it, the solution is different.
The first step is to include the needed headers. At the time of writing this the Lomse API is not yet fixed; therefore there is not a single header file (or set of headers) to include. Instead, the headers to include will depend on the classes and functions you would like to use. Anyway, with current API you will always include:
The LomseDoorway object is the access point to the Lomse library and the main interface with the library. It must be used by your application at two points:
You need to define and create an instance of LomseDoorway, usually with global scope:
For rendering on bitmaps, the most important aspect to consider to initialize Lomse is the format of the images to be generated:
But if your application will render only SVG code, these values are irrelevant and initialization is not necessary.
For rendering on bitmaps, the most important decision is how your application will allocate memory for the rendering buffer and the bitmap format to use, and how this bitmap will be rendered (or converted to a image format to be exported to a file or embedded in a document). Depending on your application operating system and on the application framework used for coding it, the solution is different. You should take these decisions by analyzing the most convenient and fast method for rendering the bitmaps and to avoid format conversions. Sometimes the options are very limited.
Once you have decided the most suitable bitmap format to use, the next parameter to decide is the intended screen resolution. This value is not important because Lomse uses vectorial graphics for all, typography included and, thus, your application can always scale the image to as much resolution as you like. Nevertheless, Lomse requires a screen resolution value to adjust internal scaling factors so that when your application sets the scale to 1.0 (100%) the document get displayed on the screen at real size. If this is not a requirement for your application, any typical value can be used (e.g. 72, 96, 144, ...). Otherwise, probably you should get this value by invoking some operating system related methods (i.e. wxDC::GetPPI() method, in wxWidgets framework).
With this, we can proceed to initialize Lomse. Here is the full code:
At end of this chapter there are summary cards with information about using Lomse in different frameworks and operating systems. See page Tutorials and samples for full application code samples.
Once a document is open and the rendering buffer for the View is created, all your application has to do is to:
These operations are usually triggered in the handler for window paint events. Notice that there is no need to ask Lomse to paint the bitmap whenever a paint event arrives. These events are generated due to different reasons. The most frequent is when the window image is damaged (i.e. another window that was covering our window has moved). But in these cases the image is preserved in the bitmap so it is enough to re-display the bitmap. Other cases for receiving paint events are because the window has changed: when the window is created or when it is resized or when your application changes its content (i.e. because the user has open a different document). Flag m_renderView is defined in your application for controlling the need to repaint the buffer: do it only when the repaint event is caused by a window resize or because the application has changed the content of the document; otherwise the Lomse buffer is still valid and you can save time by skipping to ask Lomse for a repaint:
As said, Lomse uses a Model-View-Controller architecture. This means that, internally, Lomse maintains a graphic representation of the document defined by the chosen view type. Lomse has several view types:
Vertical Book View. View type k_view_vertical_book is a view oriented to display the document in pages, with the pages spread in vertical, one page after the other in a vertical layout. The user will have to scroll down for advancing. This is the typical view used in e.g. Adobe PDF Reader and MS Word.
Horizontal Book View. View type k_view_horizontal_book means that the document will be displayed in pages, with the pages spread in horizontal, one page after the other in a horizontal layout. The user will have to scroll right for advancing. This is the typical view used to display scores in e.g. Finale or Sibelius.
Single System View. View type k_view_single_system is for rendering documents that only contain one score (e.g. LDP files, LMD files with just one score, and score files imported from other formats such as MusicXML). It will display the score in a single system, as if the paper had infinite width. And for viewing the end of the score the user will have to scroll to the right.

Single Page View. View type k_view_single_page is similar to an HTML page having a body of fixed width. All the document is rendered in a single page having the required height to contain the full document. Is a kind of k_view_vertical_book but without gaps in the content for separating pages. As with k_view_vertical_book the user will have to scroll down for advancing.
Free Flow View. View type k_view_free_flow is for rendering documents in a single page as high as necessary and as wide as the rendering window. It is similar to an HTML page with unconstrained body width.
Half Page View. View type k_view_half_page has a double behavior. In normal mode (no playback) it behaves as SinglePageView, that is the score is rendered on a single page as high as necessary to contain all the score (e.g., an HTML page having a body of fixed size). But when in playback mode, the bitmap to be rendered in the application window is split horizontally in two halves, originating two virtual vertical windows, one at top and the other at bottom. This view allows to solve the problem page turning and the problem of repetition marks and jumps during playback. See HalfPageView for more details.
When Lomse renders the document, it uses a graphic representation of the document defined by the chosen view type. When requesting Lomse to render the document onto your application window it is not expected that Lomse will squeeze all the document pages into that window, but just the specific part of the document that the user wants to visualize, as it is expected that the users can pan and zoom to see different areas of the document.
The portion of the document that is rendered on the bitmap is controlled by the viewport and the scale that your application defines (see Coordinate systems, units, scaling and viewport). Initially, the viewport is set at the top left corner of the view, and it width and height is defined by the bitmap size, scaled by the current scaling factor (initially 1.0).
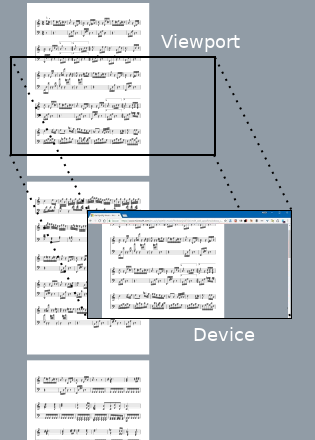
Your application can use Interactor specific methods for changing the viewport so that the user can choose what to display and to implement scrolling. See: Interactor::new_viewport(), Interactor::set_viewport_at_page_center(), Interactor::get_viewport(), Interactor::get_view_size().
Also there are methods for adjusting the scaling factor, so that the user can zoom in and out, or adjust the scale so that a whole page fits in the display. See: Interactor::get_scale(), Interactor::set_scale(), Interactor::zoom_in(), Interactor::zoom_out(), Interactor::zoom_fit_full(), Interactor::zoom_fit_width().
As these concepts are common and widely used in computer graphics theory, I will not enter here into more details, but your application have full control of what to render on the bitmap passed to Lomse as rendering buffer.
You have also the possibility of defining a view clip area so that only part of the passed rendering buffer will be used by Lomse. See Interactor::set_view_area().
Here you can find summary cards with information about using Lomse in different frameworks and operating systems. See page Tutorials and samples for full application code samples. I would appreciate if you could help me to improve this documentation. Open an issue in lomse repo or send a PR (the source of this document is at 'lomse/docs/api/mainpages/render-overview.h'). Thank you.
Qt is a free and open-source widget toolkit for creating graphical user interfaces as well as cross-platform applications that run on various software and hardware platforms such as Linux, Windows, macOS, Android or embedded systems. Looking at Qt documentation, it seems that to render an image on screen, a good approach is to use a QImage object as it can be created from a raw bitmap without the need of image format conversions if we choose the right format. To render on screen I have tested bitmaps in RGBA, 32 bits format (Lomse format k_pix_format_rgba32). This is a summary:
wxWidgets is a free and open-source widget toolkit for creating graphical user interfaces as well as cross-platform applications that run on Linux, Windows, and macOS. For wxWidgets applications I've found that using a wxImage as bitmap buffer is a good strategy, as wxImage is a platform independent class and contains a buffer for a bitmap in RGB, 24 bits format. This is a summary of how to use:
JUCE is a partially open-source cross-platform C++ application framework, used for the development of desktop and mobile applications that run on various software and hardware platforms such as Linux, Windows, macOS and Android. I have not tested it but Lomse users report that the following configuration works well:
The X Window System (X11, or simply X) is a windowing system for bitmap displays, common on Unix-like operating systems. To decide which bitmap format we are going to use it is possible to choose a common, widely supported format, such as bitmaps in RGBA format, 8 bits per pixel. But for your convenience, the code in tutorial-1-x11 includes a function "determine_suitable_bitmap_format()" for selecting a suitable bitmap format by determining the available X11 Visuals. This function has been borrowed from examples in AGG project and sets global variables m_depth (the color depth to use), m_visual (the X11 Visual to use), m_format (a Lomse enum describing the bitmap format) and m_byte_order (the endian or byte ordering for this platform).
My knowledge of using the Microsoft Windows API is nullptr. In other platforms normally your application uses one of the available image objects. Although the Windows API provides many functions for creating and managing bitmaps, as my lack of knowledge about Windows, I opted to to some tests by borrowing code from the AGG project, instead of finding documentation and studying how to use the Windows API functions. So, I choose to create a Bitmap class, enclosing the necessary methods and knowledge in it. See tutorial 1 for Windows. If you have good knowledge of the Windows API probably you would prefer a different solution for managing bitmaps. In that case, I would appreciate if you could help me to improve this documentation. Open an issue in lomse repo or send a PR (the source of this document is at 'lomse/docs/api/mainpages/render-overview.h'). Thank you. This is a summary of how I used it in the tutorials and samples:
Please help me to improve this documentation and to add information for other platforms and operating systems. Open an issue in lomse repo or send a PR (the source of this document is at 'lomse/docs/api/mainpages/render-overview.h'. Thank you.
 1.8.13